PM3/PM4
VENUE RACING SYSTEM GUIDE
Crash-B Satellite Race 2007
Edition
![]()
Crash-B Satellite Race 2007
Edition
![]()
Where to get Venue Racing Software:
Release notes, Venue Race App Version 3.0.0
Release notes, Venue Race App Version 2.8.9
Release notes, Venue Race App Version 2.6.33
Release notes, Venue Race App Version 2.6.29
Release notes, Venue Race App Version 2.6.28
Release notes, Venue Race App Version 2.6.27
Understanding the Setup Process and Race Cycle
Main Steps of Setting Up a
Race
Installing the Venue Race Application (VRA)
Verifying
and Testing the Setup
Step-by-Step: Running the Venue Race Application
Updating the Firmware on the PM3s for USB Racing
USB Connection Troubleshooting
USB Frequently Asked Questions
Step
1: Setting Up Each Erg – PM3’s
Step
3: Wiring – PM3’s and PM4’s
Wired (RS485) Connection
Troubleshooting
Morning Of (After a Night-Before Setup) for USB Races
Cable Disconnect à Keep Rowing
Operation of the Venue Race Application
Options and Choices in the Venue Racing Application
Using
an External Monitor with Concept2 Race-In-Box Dell 600m Laptops
Using other computers with
multiple displays:
Race Files and Race Management Tools
Using eRow or PM3 VRA to
create .RAC files
Format
for Race Files without the Class Variable
Format
for Race Files with the Class Variable
Suggestions for Creating
Race Files for the Best Show
Computer Networking and Venue Racing Application
USA Venue Race “RIB” Kit Contents
|
Revision |
Date |
Changes |
By |
|
001 |
12/6/04 |
Initial |
Scott |
|
002 |
|
Additions |
Scott |
|
005 |
12/28/04 |
W/ changes from MTL |
Scott |
|
006 |
1/16/05 |
Content restructured;
styles updated |
Cheri |
|
007 |
1/22/05 |
Added USB updating troubleshooting procedure,
added cable disconnect section;
truck-horn start sound information |
Scott |
|
008 |
9/28/05 |
Removed wireless
information; added cable test information; preliminary updates for 2005-2006
race season (firmware V89, Venue Race app ver 2.6.24, cable testing mode, etc.) |
Scott |
|
009 |
11/29/05 |
Updated bug notes,
firmware versions, etc. |
Scott |
|
010 |
12/12/05 |
Added external display
notes. |
Scott |
|
011 |
12/14/05 |
Added customer Q&A’s
to end of document. |
Scott |
|
012 |
12/21/05 |
Added notes about .27
version; future version (.28); and bug report related to where the “race
status display” appears on a multi-desktop situation. |
Scott |
|
013 |
12/31/05 |
Added notes for .28/.29,
a few convenience links, updated for release of .29 |
Scott |
|
014 |
3/8/06 |
Added notes for update to
.33; RF interference issues, etc. |
Scott |
|
015 |
1/9/07 |
Added notes for 2.8.9,
PM4 support, etc. |
Scott |
|
016 |
1/9/07 |
Updated for Ver 3.0.0;
long race support. |
Scott |
Please go to:
www.concept2.com/venuerace
click on Downloads,
This site will also have the latest software version available and up to date help and information.
PRIMARY CONTACT:
Phone: 802-888-5226 x 3062 during business hours
Emergency Crash-B Satellite Race Help Only:
Cell: 802-279-6753. Home: 802 253 8286
MSN IM and email: scotth@concept2.com
ALTERNATE CONTACT:
Emergency Crash-B Satallite Race Help Only:
Home 802 644 5408; mobile: 802 363 6773
See www.concept2.com/pm3; software downloads; venue racing; training.PPT file for additional emergency contact information.
Concept2 STRONGLY recommends
that all equipment be inspected and setup during business hours so Concept2 can
support you effectively!
PLEASE see notes on cable routing,
purchasing cables, and Switching Power
Supplies near the RS485 cables.
For
this manual, no attempt has been made to update all references to PM3’s to
PM3/PM4. You may substitute PM4 for any
occurrence of PM3 in this manual, except PM4’s have the “Wired” connectors
already installed, so no “Hat” is ever needed.
Also,
please note:
-
Suunto
Heartrate and Polar Heartrate is not supported during racing.
-
LogCards
are not supported during racing
· Robustness of Firmware Update program has been improved.
· Time races > 3 hours will be changed to “Variable Interval” type (no splits, see below for details)
· Support for Distance Races > 50,000m
o Up to 999,999m are now possible
o The workout type will be changed to a single “Variable Interval” type, therefore there will be NO SPLITS stored!
o PM4
firmware V18 or higher is required; Please inquire about PM3 firmware.
o This
support has NOT been extensively tested: use at own risk!!! You will have problems with older firmware
versions!
RECENT ITEMS OF NOTE:
1) Where possible, keep all wires away from switching power supplies such as supplied with many types of electronic equipment.
2) When setting up USB races, exit the PM3 Venue Race application until all PM3’s are setup and connected. Then run the app and try to discover them. Sometimes the Venue Race Application running will interfere with windows trying to connect to the PM3’s.
· Improved handling of resolution or color depth changes. May not handle re-arrangement of desktop orientations well. Advise is still to exit the app, make the change, then re-run the app, but you can try to make some changes on the fly and it might work. Please let concept2 know how to reproduce any problems you may have with this.
· Concept2 background logo .jpg file installed in the /PM3 Racing folder can be used as wallpaper for any time the race screen is not available (suggested as an alternative to the Windows or Dell or similar logo)
· Improved handling of network directories for race files, log files, results files.
· Minor improvements in Results Review and Results Printing; changed to Courier New font.
· Help system added.
** Some PM3’s may not go into “Loader” mode easily. They may stay in the main menu, or may just blank out. If this happens, hold down Top, Bottom, and Change Units button and reset the PM3 (Pinhole in the back, or remove/replace a battery). This will force it into Loader Mode.
** Some PM3’s may not fully update with the “Ver 90 with Loader” update. They may “Hiccup” in the middle, give an error on the PC. If this happens, slowly just click OK, continue, etc. to restart the process. It will pick up where it left off. If it does not, please try the above procedure to force it into Loader Mode and try again.
You MUST do a successful test race with ALL the ergs ‘in the race’ (including masters!) before you start your racing day. This is so that A) you find out if there are any problems and B) so that the PM3’s are set to the correct clock speed (especially important for the master!).
If you have to reset a PM3 or replace batteries during the day, it is recommended that you run a test race to ensure that the PM3’s clock is set properly.
After reset, you can rediscover or renumber them all, but in most cases just clicking on Setup then waiting for the VRA to report the right # of ergs, then clicking OK and it should find the PM3 and be ready to roll again. If not, then try Rediscovering, or ReNumbering if needed.
After resetting a PM3 you may note an anomaly on the first race only: The ROW sign will be shown for a VERY short amount of time, and then the normal 4 race display showing 4 competitors names will show. This is another good reason to run a quick test after setting up and/or resetting PM3’s.
All “Hats” should be installed, then PM3 reset. If after reset, ProductID says Ver 63, this means you have a hat that was not properly erased. Please erase the Hat using the “PM3 Firmware Expansion Erase” shortcut. You can do these one at a time or as a “gang”. This process too may fail occasionally. If so, just try again, it will work the 2nd time.
There is a known issue with this version of V90/91 firmware and this 2.6.27 Venue Race app where you may get some PM3’s that show “ROW” then “KEEP ROWING” even though the cables are good. The Yellow boats on the PC keep moving, the race will complete OK except the competitor will not know where they are in the race. If this happens, the workaround is to “pinhole reset” the PM3 and the problem will go away.
There
is a known issue with the Cable Test mode.
This mode is known to possibly corrupt some memory in the PM3 which is
thought to cause the above “Keep Rowing” problem described above, as well as
possibly any number of other problems such as a complete PM3 crash the first
time a test race is set up after a cable test.
Recommendation: reset PM3’s after
cable testing, and run a test race before your racing day starts!
Welcome!
This document will guide you through the process of setting up an indoor rowing race using Concept2 PM3s and the PM3 Venue Race software.
· 1Ghz or higher Pentium class processor (1.4ghz M processor or 2.0ghz Pentium 4 recommended)
· For Wired or USB operation: USB 2.0 port (2 or more preferred); refer to the USB Notes section for more information
· For Wireless operation: Ethernet RJ45 port
· Windows XP Home or XP Pro (Service Pack 2 for proper USB function)
· PM3 Venue Racing Software (recently downloaded)
· High-quality graphics chip such as Radeon 7000 or 9000 series with minimum 32M Video Ram are recommended
· 2GB of hard disk space is recommended on C drive.
· Intel chipsets seem to work well (see Figure 1). According to customers, Via chipsets have worked acceptably.
· “Standard” USB 2.0 Chipsets have been problematic, please avoid them! It is believed that these are NEC chipsets.
· Concept2 has had trouble with some models of Compaq and Toshiba laptops; these laptops do not seem to support USB well. The Toshiba seemed to work with PM3s attached directly to the PC, but when hubs were introduced they would not work at all. We are not sure what the problem is, but at this time Concept2 does not recommend using these brands.
· Ensure that Windows XP Service Pack 2 is installed.
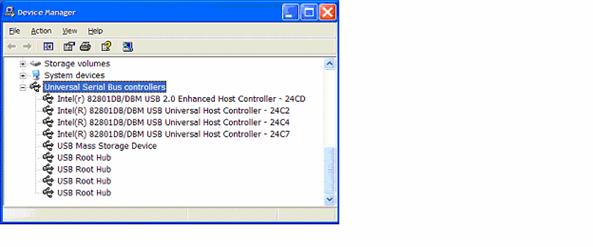
Figure 1 — Intel Chipset
The above hard disk space requirements call for 2GB of free
space. The application itself does not
need this much room, however the VRA application creates very extensive (and
large) log files for post-race diagnostics use.
These files are stored by default in: MyDocuments\Concept2\Venue
Racing\Data\LogData
Each race can take up to 6 MB of space (depending on the number of ergs and the length (in time) of the race). Ten hours of racing every 15 minutes could take up to 240 MB of space!
This section outlines the main steps of setting up and running a race using the PM3 Venue Race Application.
1. Select a connection method
2. Install the VRA on your laptop/PC
3. Check the firmware version on the PM3s and/or expansion hats; update them if necessary
4. Connect the PM3s per the method you chose
5. Discover the PM3s
6. Enumerate the PM3s
7. Verify and test the setup
8. Create (or load) the race
9. Start the race
10. Finish the race and create a results file
11. Load the next race
Let’s dive into some of the details of what we just outlined above.
Prior to running a race, you must decide on which method to use to connect the PM3s to the Venue Race Application. The method you choose generally depends on the number of rowers you will be using for the event. Use the following table to determine the method of connection that will best suit your race.
|
Connection method |
recommended venue size |
maximum restrictions |
requirements |
|
USB |
2-20 |
Maximum 28 |
Hubs |
|
Wired |
10-40 |
Absolute limit: 80 units including master. |
PM3 w/ “Hats” or PM4 |
1. Please ensure that your PC meets minimum system requirements.
2. Before racing, make sure that all PC power management features such as screen savers or automatic hibernate mode are turned off. Having a screen saver or automatic hibernate mode activate in the middle of a race or during a break is not very fun!
3. Download the latest version of the Venue Race Application and associated utilities from: www.concept2.com/venuerace. If you wish to get the bleeding edge software which may not have been fully tested yet, you can obtain it here: www.concept2.com/products/pm3/test/c2venuerace/prerelease/setup.exe
4.
Run the setup.exe file you downloaded.
Please be patient! It can take up to a minute for the installer to display a
prompt, and it may look as though nothing is happening. Do not click on the setup.exe again until
you are sure it has not started.
5. Click “I agree,” and then click Next.
6. Continue clicking Next until the installation is complete.
7. Take note of the new icons on your desktop, as well as the new options in your Start | All Programs menu. The icons on your desktop are as follows:
· PM3 Venue Race: This is the Venue Racing program. It is similar to eRow but for the PM3.
· PM3 Firmware Update for Venue Racing: This icon is for updating the firmware in the PM3 for USB or Wired racing. For 2007 race season this should be between PM3 Version 98, PM4 Version 17. Any other versions will not work as expected.
· PM3 Expansion Firmware Update for Venue Racing: This icon is for updating the firmware in the expansion hats. It should NOT BE USED if present.
·
PM3 Expansion Card Erase: If you are using
“hats” and they seem to have firmware installed, this can be used to erase
them. Concept2 believes that all hats
shipped from Concept2 are already erased; it is possible that some in
· Start | All Programs | Concept2: - you will find duplicates of some of the above items.
Connecting the PM3s pertains to how the PM3s will communicate with the PC during the race. In the following pages, you will find detailed chapters on how to connect the PM3s using the connection method you chose. For the purposes of this overview, we will not yet get into connecting the PM3s. For now, let’s assume that the PM3s are connected to the PC and you have launched the VRA.
The Venue Race Application (VRA) has a setup wizard to guide you through the process of discovering and enumerating the ergs and setting up the first race. The following descriptions reference use of this wizard.
Once the PM3s are communicating with the PC, the VRA needs to acknowledge or discover that they exist, determine how many are present and how to communicate with them. The wizard will ask you how they are connected (that is, which connection method you are using—USB, Wired, or Wireless), and then attempt to discover them. Successful outcome of this step is for the VRA to discover as many ergs as you actually have… in other words, for the VRA to tell you there are 10 ergs when you actually have 10 ergs connected.
At this point, the PC may (USB) or may not (Wired) know how many PM3s exist. However, the PC does not know which one should be numbered 1, 2, 3, etc. At this moment, the PC only knows them by their serial number. During enumeration, each PM3 displays a large question mark and prompts you to press a button. As you press this button on each PM3, the VRA will assign that PM3 a number in sequence. You will need to repeat this step until all the PM3s are numbered. The number that is assigned to a PM3 replaces the large question mark on the screen.
After all the PM3s are numbered you should check them for accuracy. Are they all sequentially numbered? Is Lane 1 where it should be?
The setup wizard continues to assist you by setting up the first race (that is, creating a race file, or an .RAC file). If you continue, a generic race (no participant names on the screen) will be set up for testing or racing purposes. Alternatively, canceling the wizard will allow you to load a pre-defined .RAC file.
Race starts no longer use a countdown. Buttons on the VRA control bar (menu) are used to sequence through WarmUp, Stop/Prepare to Start, Sit Ready, Attention, and ROW screens.
When the last rower has finished the race, the race is finished. If all the PM3s have crossed the finish line, then the VRA automatically retrieves all the PM3s split data and finish times and compiles a result file. If not all the PM3s finished, click the Stop button on the VRA control bar to finish the race and retrieve the final results.
1. Launch the VRA from the Start | Programs menu or by clicking the appropriate icon on the desktop. The VRA launches the setup wizard and presents an option for advanced users to bypass the wizard.
When you start the Venue Race Application for the first time, the application may display a Window Security Alert similar to the following:
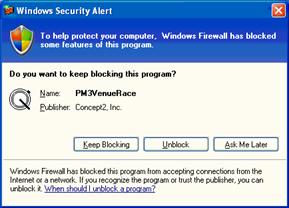
Concept2 believes that it is safe and appropriate to click Unblock.
2. Click Next to continue the wizard.
3. You are now looking at STEP 1 and a choice between USB or Wired race. STOP now and hook up all your wired PM3’s or PM4’s, or if they are already connected make sure they are turned on. They will slowly change to a “Lane 0” screen. This is normal and expected – it’s the venue race applications way of keeping the PM3’s and PM4’s on (so they don’t turn off). When they are all on then…
4. Select the connection method (USB, or Wired) appropriate for your race, and click Next.
5. Wait for the wizard to discover the ergs. Depending on the number of ergs in the field, this should take less than 15 seconds. The wizard will display “Discovering Ergs…Please Wait” during this time.
6. Once the VRA has discovered as many ergs as it can, it will notify the operator and allow an option to either continue by selecting Next or request assistance by selecting Help. If the application discovers the correct number of ergs, then select Next. Otherwise select Help for troubleshooting information. NOTE: if using WIRED system, you may only see the ONE PM4 directly attached to the computer – this is normal – do not panic!
7. The wizard then provides the ability to assign a physical address equivalent to a lane number to each erg. These numbers will correspond to the lane numbers derived from the race files. By selecting Number all Ergs, the application initializes all ergs to allow the assignment of a unique address to each erg. Starting with the erg that occupies lane #1, request a lane number by pressing the proper key on the erg and then either confirm or reject the offered lane number depending on whether it is correct. Continue this process until all ergs are properly numbered. Note: The wizard text updates each time an address is assigned, providing a summary of all currently assigned addresses.
8. Once all the ergs are properly numbered, select Done Numbering and then click Next. Note: You must select Done Numbering before selecting Next to continue the wizard.
9. The next step in the wizard allows you to define a new race. It is not necessary to define a new race, save it and configure the PM3s. Selecting Cancel at this point will cause the application to rediscover and restore the previously assigned physical addresses before allowing access to the remainder of the application features.
10. The VRA stores the race configuration in the Windows registry after successfully discovering and numbering the ergs. When the application is run the next time, the discovery process will compare the current race configuration to the last known race configuration. If nothing has changed, all ergs are automatically numbered and racing can begin without step 5 above. Canceling the wizard at any point will result in restoring the previous configuration automatically as well. The restore operation occurs regardless of whether the PM3s have remained on or have been turned off and restarted.
11. If the application detects one or more changes to the race configuration, only those ergs that were in the previous configuration will be restored. The application will allow the operator the opportunity to assign addresses to the newly introduced ergs without affecting the existing ergs.
· USB hubs
· 15’ long USB 1.1 or 2.0 cables for each erg
· 15’ long USB 2.0 cables from hubs-to-PC and hub-to-hub
· Strain Relief Brackets or tape
· Hub brackets
· Power to each hub
· Model C or D Rowers with properly configured PM3s, updated to latest version of racing firmware
First, please check the PM3’s that you have. If they were received from Concept2 after Jan 1, 2006, they will definitely have V89 or above firmware. These may not need to be updated. Please contact Concept2 if you wish to confirm version number.
If you have PM3’s with Ver 88 or below, or 900 or above, you MUST update the firmware in your PM3:
1. Boot up the computer and login as administrator (or for Concept2 Dell RIB Computers, login as “Racing”).
2. Install the VRA, if you have not already done so. (already installed if using Concept2 RIB computer)
3. Connect the Adaptec Xhub+ (hereafter referred to as ‘hub’) to the PC using a USB cable, and plug the hub into an AC wall socket using the adapter that came with the hub.
4. If there is another USB port on the PC, connect an additional hub directly to the PC. If there is only one USB port on the PC, connect an additional hub using port 1 on the first hub.
5. Using USB cables, connect the PM3s that will be used for racing. You can connect up to 14 PM3s.
6. Click the PM3 Firmware Update for Venue Racing icon
7. Verify that the number of PM3s connected matches what the program tells you.
8. Click Update and wait until it completes successfully.
9. If you have more PM3s to update, plug these in place of the ones that were just programmed and repeat the programming process.
10. Disconnect the hubs and PM3s and proceed to setup.
Symptom: When you click “One Step Update”, you encounter some or all PM3’s that do NOT show the “Loader” screen or go completely “Blank”.
Solution: Follow this procedure to force the PM3 into “Loader” mode.
· Please refer to the wiring diagram to figure out how many hubs you will need.
· Concept2 recommends Adaptec XHub7+ or Concept2 part number 1476.
· For US Races, hubs are usually provided with the Race-In-The-Box system.
·
For International races, we encourage dealers to
get the hubs locally with a power cord appropriate for the area. If the hub is not available locally, you can
order them from Concept2 but please note it will come with a
· Concept2 recommends part number 1182. This is a metal bracket for the Adaptec XHub. This bracket holds the hub in the triangle of the front legs, and there are slots for strain relief of the cables. Refer to the following graphic.
 Part number 1461 is the USB 1.1 black cable
you are familiar with—this is the same as the cable that comes with the
rower. You will need one cable for
every rower to connect it to the hub.
This cable has been used for hub-to-PC use, but Concept2 recommends use
of a USB 2.0 cable, such as part number 1477.
Part number 1461 is the USB 1.1 black cable
you are familiar with—this is the same as the cable that comes with the
rower. You will need one cable for
every rower to connect it to the hub.
This cable has been used for hub-to-PC use, but Concept2 recommends use
of a USB 2.0 cable, such as part number 1477.
Part number 1477 is a black and grey USB 2.0 cable with a right-angle connection on one end. This part is designed for hub-to-hub and hub-to-PC communication to ensure reliable data transmission, however it is also an excellent part for PM3 use as well.
Part number 1712 is a cable strain relief bracket that Concept2 recommends using. The bracket can be placed as shown in or at the lower bolt. Taping the cables to the arm also works, but leave a small loop of cable for arm/monitor movement.
· Connect up to 10 ergs to any single USB port on a PC using 2 hubs. Refer to the wiring diagram.
·
When cabling from one hub to the next, the cable
must plug into port 1, 3, or 5 on the
hub closest to the PC. Note: Port number designations are displayed
next to each connection on the hub.
· If you are using more than 13 ergs, then you can connect up to an additional 13 ergs to a different USB port on the computer.
· At this time, connecting more than 20 ergs is not recommended.
· Dress wires through strain relief brackets (Concept2 part number 1712)
· Ensure that the PM3s have been updated to the firmware revision that was provided with the software release you are using.
· Ensure that there are no more than two USB hubs between the PM3s and the computer.
· Ensure that the hubs that are connected together (that is, daisy-chained) are plugged into port 1, 3, or 5 of the previous hub (Adaptec Xhub7+ only).
· Concept2 does not currently recommend using USB extension cables, because they count as a hub, however they do seem to work if used sparingly in smaller setups.
· Ensure that Windows XP Service Pack 2 is installed and any USB drivers are updated to the most recent available from that manufacturer. If you are using a Concept2 Dell 600m RIB system, this is already done for you.
· Ensure that power is being provided from a wall source (110-220v) to the hubs.
· Ensure that no single cable between hubs, computers, or PM3s are over 15' (5m) long. USB cannot support longer cables between active components contained within each of these devices.
· Occasionally, PM3s are not properly recognized by Windows. To remedy this, try the following techniques:
· Exit out of the Venue Racing Application until all PM3’s are attached and shown in DeviceManager (see below)
· Run DeviceManager and expand the Human Interface Devices section. Look for yellow (!). This indicates a PM3 that is not working properly.
![]() Note: To add a DeviceManager icon to
your desktop:
Note: To add a DeviceManager icon to
your desktop:
o Right-click the desktop.
o Click New, and then click Shortcut.
o On the Create Shortcut window, click Browse.
o Navigate and expand the System32 folder by expanding My Computer, Local Disk C, and the Windows folders.
o In the System32 folder, select devmgmt.msc, and then click OK.
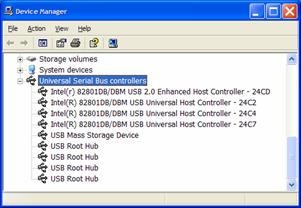
· In DeviceManager expand Universal Serial Bus Controllers. Now look for Unknown Devices. This may indicate that a PM3 is not working properly.
· On XHub7+, there is an indicator for Power, Uplink (connection to another hub or to the computer), and one for each port. If a PM3 is connected to a port and the light is not lit, then this device is not communicating properly. Try unplugging it, wait 10 seconds minimum (or you may confuse Windows!) and plug it back in. Observe the light for 30-60 seconds to ensure that it comes on and stays on. If it does not, there is a problem with the PM3, cable, or computer.
· The USB Chipset in the computer can be a problem. So far, Intel chipsets (see graphic below) have been successful, however NEC chipsets and “Standard OHCI” have not been successful.
Q: Can I get USB Cables longer than 5m (15ft) long?
A: 5 meter cables are the maximum that USB supports. If you
are careful and place the PC close to the first erg, 10-13 ergs on each side of
a PC is very possible with normal 4 foot (center-to-center) spacing we use here
in the
Q: Can I use USB extension cables?
A: It is possible to obtain "Active" USB 2.0 USB extension cables (such as BAFO makes), but they can introduce discovery issues, and they also act as a "hub" which, depending on your configuration, could cause you unexpected issues. If you try one on your own, ensure that it is USB 2.0. Also, please note that Windows only allows 5 hubs between the computer and the furthest device in the chain. One of those hubs is in your computer, so now you only have 4. Each XHub7+ is two hubs in one.
n 15’ CAT5/CAT5e/Cat6/Cat6e Shielded Cables (one for each PM3 plus a few spares)
n Terminators (two per segment)
n USB Cables (one per segment)
n Extra PM3s (one per segment, optional, recommended)
n Part number 1983 (at least one per segment for “Master” PM3)
n Part number 1983 (one per PM3 in the race line)
n Cable strain relief bracket (optional, recommended)
n Thumbscrew to secure hat to PM3
Purchasing Cables—General use 14’ – 25’ Ethernet Patch cables (category 5 preferred) are used to make the connection between units. They are not being used for Ethernet, but Concept2 chose to use these cables as they are easy to obtain at any computer supply company. Concept2 has found that SHIELDED cables work best at eliminating noise from noisy “switching power supplies” which may cause issues and also from Static Electricity (ESD) problems.
Terminators must be used on each end of the wire. If they are not used, the signal goes down the wire, hits the “open circuit” at the end and bounces back. Terminators are provided by Concept2 in race kits and are available upon request.
Making Terminators—Terminators can be easily made with a 120 ohm resistor connected between pins 1 and 2 of an RJ45 connector. These resistors can be crimped into the connector or can be soldered to a cut-off patch cable (locate pins 1 and 2; they are usually the green or orange pair of wires).
A--Check the Firmware Version of the PM3 in use. To do this:
1. Access the Main Menu on the PM3.
2. On the Main Menu, press the button next to More Options.
3. On the More Options window, press the button next to Utilities.
4. On the Utilities menu, press the button next to Product ID.
5. Make sure the Firmware version is above 88 and below 900 – if not please update the firmware in your PM3.
B—Remove the battery door screw and battery door.
C—Install the 1983 module (Hat) onto the PM3. To install, evenly apply pressure until it snaps into place and ensure that the catch is going to mate with the battery door catch slot.
D—Use a thick paperclip or a Concept2 PM3 Reset Tool to reset the PM3. To reset the PM3, insert the paperclip or reset tool into the small hole in the PM3 case. This hole is located on the rear left-hand side of the PM3 when the connectors are facing down. To confirm a successful reset, watch the PM3 screen. It will go blank briefly, and then the C2 logo will appear.
It is recommended that you install provided thumbscrew. If these items are not available please use the battery door screw to secure the hat.
 Use 14’-15’ or longer Shielded Ethernet
patch cables between the "master" PM3 and the "slave"
PM3s.
Use 14’-15’ or longer Shielded Ethernet
patch cables between the "master" PM3 and the "slave"
PM3s. Notes:
· As shown in the diagrams, you can have more than one "Master" erg.
· As shown in the diagrams, the "Master" erg may be placed on a table near the computers, as there is a 15' USB cable length. In this case, enumerate this PM3 as the last one (that is, #21 if there are 21 ergs in a 20 erg race setup). It will just sit there and make the translation between USB and RS485 wired signals.
 Step 4: Securing of Cables
Concept2 recommends securing the cables to the monitor arm using one of the following methods:
· Gaffers Tape, which does not leave a residue
· Duct (Duck) tape
· Concept2's strain relief bracket (PN 1181).
Enumeration on Wired systems can be a little confusing. It is helpful to keep this statement in mind: The Master PM3 and the PC cannot know how many PM3s are connected until we help them locate the PM3s. After they are found, the PC can find them automatically. To do this:
· Run the Venue Racing software and let the setup wizard start.
· Select Wired with RS485 Expansion Modules and click Next.
·
If this is the first time you are setting up
this system, the software should identify the PM3s that are directly connected
to the PC via USB Cables. If this number
is correct, click Next. If not, click
Help, fix the problems, and then click Discover. When all ergs are identified, click Next. If
you need additional assistance, refer to the troubleshooting section.
Note:
If you have previously set up wired PM3s, it may show more than just the
directly attached PM3s by virtue of restoring the previous configuration.
Now we will get all the PM3s on-line, discovered, and numbered at once:
· Click Number Ergs.
· Go to erg #1 (any one you choose, the master or any slave) and press Request ID, then Confirm.
· Repeat the previous step for the rest of the ergs.
· When you click Done Numbering, the PC and Master unit know about all the PM3s that are out there on the wire, and they are all numbered.
· Ensure that each master PM3 is either connected via USB to the host PC.
· Ensure that the PM3 at each end of the wired race configuration has a terminator present.
· Ensure that the correct version of firmware has been installed in ALL the PM3s and NO hats have any code in them
· After selecting Number Ergs, a question mark should appear on every PM3 that is properly connected to the host PC. If not all PM3s display a question mark, double check the connection on either side of each PM3, select Done Numbering and then reselect Number Ergs to see if the previously missing PM3s are now displaying a question mark. If a faulty cable or connection to an expansion hat exists, the PM3s beyond the offending PM3 will not have question marks. This behavior allows the systematic confirmation of connections to each PM3. Also check the firmware in the PM3: Firmware versions before Ver 90 will not enumerate properly. Use the cable test mode to find problems.
· In rare cases where the connections appear to be sound, but one or more PM3s in the race configuration are either not showing the question mark or do not change displays after selecting Requesting Next Lane #, substituting an expansion hat is recommended. This situation would arise if the non-responsive PM3 were located in the middle of the configuration with PM3s on either side operating properly.
· If substituting an expansion hat does not fix the problem, substitute a PM3 and follow the same steps.
· If many changes have been made to the chain of PM3s, the Venue Race Application may get confused. You might try, as a last resort, closing the VRA, deleting the Erg Map from the registry, and then re-launching the VRA in order to rediscover them.
· Switching powers supplies and other equipment have been known to induce electrical noise into the cables causing intermittent problems. Concept2 recommends the use of Shielded cables, and moving all switching power supplies away from the cables. Close proximity of unshielded cables and switching power supplies are a known problem and should be avoided: try shielded cables and moving switching power adapters away from the cables.
A cable testing mode is now available for checking the integrity of the wire and connections.
Steps:
o More;
o Race;
o Communication
o Utilities
o Cable Test
o Start Test
On a PM4 select,
o Games;
o Racing;
o Help
o Cable Test
o Start Test
è If some are not fast-blink-green, then there is a connection problem.
è If they all remain fast-blink-green, then the system should be in good shape.
è If any go RED and stay red, you have discovered a solid fault.
è If any are observed to be fast-blink-yellow, then the connection was lost momentarily but has been restored. You should cancel and restart the test and observe carefully where the fault is.
Q: Can the master PM3 go anywhere in the chain?
A: Yes. Just make sure that there is a terminator at each end (any unused connection points).
Q: Why do I discover a different number than I expected?
A: The master (or masters—that is, the PM3s connected directly to the PC) should always be discovered. The slaves will be discovered if they have previously been discovered and numbered.
Q: Should I setup a few PM3s on a wired chain, discover them, and then keep adding on PM3s as I would have done with the PM2+?
A: No, this is not advised. Attach all the PM3s and discover/enumerate them all at once. This saves time and will be less confusing.
Q: Can I mix versions of firmware?
A: No, please use the same version of firmware in all the PM3’s.It is recommended that you use the firmware that was included in the installation package.
Most race organizers will set up the night before and make sure everything is working. If this is the case, there are some special notes for you:
1. Once you are done for the night and want to shut everything down, exit out of the VRA.
2. When you exit, the VRA will display the following prompt: Do you wish to put the PM3s in Normal Mode? Answer yes. The VRA will display the Main Menu on all the PM3s.
3. Shutdown the computer and/or disconnect the USB cable. After about 4 minutes, the PM3s will all turn off to save battery power. If you do not follow this procedure, the PM3s may stay on all night.
4. Disconnect power to the USB Hubs.
1. When you come in the next morning, disconnect the USB cable from the computer before turning on the computer. Some PC's will have trouble booting up when many USB devices are attached (such as Concept2's Dell Insperion 600m's).
2. Boot up the computer and login. Do NOT run the VRA yet.
3. Apply power to the USB hubs.
4. Plug the cable from ONE of the USB hubs into the computer. Wait for several minutes. You can verify that the Hub/PC has properly enumerated all PM3s by checking Device Manager on the PC and the LED’s on the USB Hub.
5. (If applicable) plug in the cable from another USB hub. Wait several minutes, repeat as needed.
6. Wait another minute. This is to allow Windows to recognize all of the USB devices properly. Windows can be very slow at this.
7. Run the PM3 Venue Race Application.
8. As the wizard is running, please be VERY sure that it tells you that you have the expected number of ergs. If not, use the Help button, and click Discover again. If this is not working, refer to the USB Connection Troubleshooting section.
9. Please check carefully on the PM3s that the numbering is correct. If not, use the wizard to correct.
10. Run a test race of 50m and ensure that all boats move when the race is started.
1. When exiting the Venue Race Application, you will be prompted to “Put the PM3s back in normal mode." Answer yes.
2. Unplug all but (up to) 7 or 14 PM3s that are attached to a hub that is attached directly to the computer.
3. Downgrade the PM3s using the desktop shortcut “PM3 Firmware Restore to Vxx” (currently Ver 82) or by the following procedure: Start | All-Programs | Concept2 | PM3 Firmware Restore to Ver 82.
4.
When this is complete, disconnect the PM3s and
attach more (as appropriate) in the same manner as above and downgrade them in
the same manner. Repeat as needed until
all are done.
During the course of the race, you may encounter a hardware fault such as a cable disconnection. The PM3 venue Racing system has been designed such that if a connection (USB, Wired, or Wireless) is broken during a race, the PM3 should continue to keep score for that individual user.
What happens during a broken connection?
PM3: After about 10 seconds of no data from the PC, the PM3 will display “KEEP ROWING” at the bottom of the PM3 screen. Scores will be kept in the PM3 at the end of the race and must be recorded manually.
Venue Race Application: The boat will turn white with a boarder and will stop moving forward (will appear to move to the left of the screen) until it disappears.
If the connection is not reestablished by the end of the race, manual scores should be collected from the disconnected ergs, however best practice would be to collect results from all the ergs.
Reconnection:
Unlike prior versions, Venue Race 2.8.9 and above should reestablish connection with PM3’s and PM4’s within 30 seconds of reconnecting cables.
This section provides brief explanations of the options located on the PM3 Indoor Racing Control Panel. Note: Locations of some menu options will be changing.
Allows you to create a new race and a new .RAC file by selecting the type of race and typing in names.
Allows you to display existing race files for modification.
Allows you to edit the race file currently open.
When the race has been created or loaded properly and the PM3’s are in the “OK to Warm Up” state, this button starts the race start sequence.
Provides various options for viewing the race (100M at a time, 200M at a time, 500M at a time, 1000M at a time, and Auto).
Allows you to define your connection method, discover the ergs, and enumerate the ergs. Usually you will use the setup wizard to define this information.
Special feature – Backup/restore Erg Map: This allows you to save a copy of the map of ergs. This is useful if you have two different setups during the day (such as slides or team racing) or want to transfer the “map” to another computer.
Contains two tabs: Preferences and Race View Options
Preference Tab
The Preference Tab contains several types of information:
·
Default directory location the VRA will use to
store the Race Files, the Race Results Files, and the
· Start type to be used for the race
· Format to use for reports
· Units Reset option
· Network option
· Language Option
Default File Locations
Please Note: NEVER send results or split/stroke data to a network drive. If you loose connection to the network for any reason, you may not get results!
Race Start Types
There are three different race starts available: Countdown, Random Start, and Modified Random start.
· Countdown is similar to e-Row starts where a backward count from 5 (5-4-3-2-1-Row) is given. Concept2 no longer recommends using this start, but it is available for use if desired.
· Random start gives the users a sequence of "Stop, Prepare to Start"; "Sit Ready"; "Attention"; "Row". The sequence from Sit Ready to Row is controlled by RANDOM times so that users cannot predict the start and therefore are less likely to jump the start. This is more like on-water starts. The minimum/maximum limits for these random times are preset. These settings can be modified in the system registry as required. Be sure to exit the venue race application prior to modifying any registry key values.
· Modified random start is the same as Random start, except the transition from "Sit Ready" to "Attention" is manually controlled. This is useful for larger venues where it sometimes takes a little more time to get every one in the "Sit Ready" state. Concept2 recommends either Random or Modified Random starts for venue races.
Reset Display Units on
Open Race:
This option allows you to have the PM3/PM4’s units reset each time a new race is opened. If this is not checked, the units selected by the last participant will be used for the next race.
Network:
These settings are for real-time network/internet broadcast of race data. At this time there are no clients to receive the data. Concept2 recommends leaving this box unchecked. If you are interested in writing a client to receive the data, please contact Concept2.
PM3/PM4 language
default:
You have several choices:
- No Change: The venue race application will not attempt to change the language on any PM3 or PM4.
- English, French, etc.: The venue race application will force all monitors to this particular language if supported in the firmware. Please note that not all languages are available.
- Get From Race File: The venue race application will use special “country codes” in the .RAC file and interpret them as “language codes” instead, forcing individual PM’s to use the language specified. This way, a French speaker sitting with a bunch of English speakers can have his PM in French, the Engligh speakers will get their English prompts.
Report Format
This options allows you to choose whether data elements in reports will separated by a comma (comma delimited) or by a tab (tab delimited. The default is comma delimited, and you can leave this default setting for most uses. To produce reports that are easier to read, select the tab delimited setting.
Race View Options Tab
The Race View Options tab allows you to control what you see during a race.
Right Column
Choose from the following displays for the right column:
Allows you to have the VRA auto sort the race lanes according to a meter increment you define. For example, if you enter 100 in this field, whenever the lead boat gets to 100 meters, the field will be resorted such that the lead boat will be at the top, followed by the 2nd place boat, etc. A caveat to auto sorting is that it can be confusing for the audience if rower names are not displayed. The best time to use this feature is whenever you have many more lanes in use than can be displayed on the screen.
One of the benefits of auto sorting is that it will drop off the screen any erg that goes offline (as it drops off the end, then gets sorted to the bottom). However, this can be a problem when determining what is wrong with a connection.
A general tip is that if you are using auto sort with multi-class races, minimize the number of empty boats in each class. Although they are sorted to the bottom of the class, this means scrolling more to other classes. It is also suggested that you turn off auto sort when running team races. In most cases, they all fit on the screen, and scrambling them only seems to confuse things.
Always Display Rower Names
If rower names are typed in or imported, most race organizers will check this box to display the rowers name in their lane. If just lane numbers are used, then this box is usually best left unchecked as the lane number is also inside the boat.
Auto Scale is Default
In a tight race, the boats will remain large and move quickly across the screen. In a race where there are some rowers that are much slower than others, they may be left off the screen. The race computer operator can choose to manually change the race view width occasionally, or this option can be turned on. If checked, when the slowest boat has completely disappeared from the screen, the width scale will be changed to attempt to keep them on the screen. Boats will then be smaller and move more slowly across the screen, but all boats will be shown (if possible)
Additional display options can be found in the Windows Registry.
Sound WAV Files
Random Start:
stoprowing.wav “Stop rowing and prepare for the Start” announcement for both Random start types
sitready.wav “sit ready” sound/voice
attention.wav “Attention” sound/voice
start.wav Truckhorn sound for “Row”
falsestart.wav Boxing
Whop.wav Used to indicate an error in the start sequence
Countdown Start:
stoprowing.wav “Stop rowing and prepare for the Start” announcement for both Random start types
Whop.wav Used to indicate an error in the start sequence
Five.wav “Five” announcement for Countdown start type
Four.wav “Four” announcement for Countdown start type
Three.wav “Three” announcement for Countdown start type
Two.wav “Two” announcement for Countdown start type
One.wav “One” announcement for Countdown start type
Start.wav Truckhorn to start the race
falsestart.wav Boxing
Each of these sound files can be deleted or replaced with empty.wav so there is no sound for that step. In addition, there are supplemental files delivered that can replace some sounds, such as:
Buzzer.wav An alternate starting buzzer
Boxingbell.wav Just the bell sound without the voice
Etc.
You can experiment, find your own sounds, record your own voice, etc. and replace the appropriate files.
Shut down and power off the Laptop.
Plug in your external monitor, and turn it on.
Power up the laptop.
You should see the desktop and desktop icons on the laptop, and the desktop with no icons on the external monitor.
Locate the icons on the desktop to use the external the desktop for the number of lanes you desire.
i.e. Ext Desktop 10 Lanes (default)
Ext Desktop 13 Lanes
Ext Desktop 17 Lanes
Double click the icon you need. Please note the # of lanes is approximate and can vary by a few lanes depending on the display used and how the windows are sized.
Open the PM3 Racing folder.
If it opens on the external monitor, you can bring it back
to the laptop by moving the mouse to the right past the edge of the laptop
screen and into the external monitor desktop area. Click on the boxed arrow ![]() found in
the top right area of the window. This toggles the window between the two
screens.
found in
the top right area of the window. This toggles the window between the two
screens.
Double click on the PM3 Venue Race shortcut
You may setup your race now.
To display the race lanes on the external screen, locate the
box with the right pointing arrow ![]() and click
on it. This moves only the lane screen to the other
monitor. You maximize and minimize the
screen just like any other windows screen, using the buttons at the top right
of the window.
and click
on it. This moves only the lane screen to the other
monitor. You maximize and minimize the
screen just like any other windows screen, using the buttons at the top right
of the window.
The PM3 Indoor Racing Control panel will remain on the laptop screen.
If you would like to move it to the external screen, move the mouse arrow on to the control panel. Hold the left button of the touchpad down and drag it over to the right, past the edge of the laptop screen onto the external screen.
Similar techniques to above can be applied to any Windows computer with multiple video outputs. Many current laptops can have different outputs on their VGA or SVideo ports than on the LCD display, and desktops can have multi-output video cards installed.
Concept2 endorses the use of UltraMon (http://www.realtimesoft.com/ultramon/)
for managing multiple video displays.
The UltraMon product is what allows the ![]() icon to be displayed.
icon to be displayed.
If UltraMon is not available, you can change resolutions and move windows around manually. See the Q&A from Users section for more information.
Choices for external displays:
Composite:
After you have converted the display to composite (RCA type round connector) using the SVideo to Composite adapter or a TViewGold VGA to composite adapter, you can then attach many devices:
Please see also the Q&A from Users section for additional notes on displaying the race on external screens….
For larger races, race organizers typically prepare .RAC files with competitor’s names in advance, and have a system for analyzing results. Some race organizers have created their own programs to make files, others use the PM3 VRA to create the files, and still others use ErGo.
If you are creating your own race files, please note some general guidelines:
· Race names should not exceed 16 characters
· Race participant names do not have a programmatic limit, but only 10 – 12 characters are displayed on the PM3 warmup screen
“ErGO! Is an Indoor Race Management Database. It is a tool to help you schedule athletes into their events (including from web-based registration lists), automatically assign seats to those athletes, create E-Row race files, upload E-Row results files, and it quickly generate results. ErGO! has many additional features including a "Athlete Data Integrity" function which verifies athletes are entered into their correct events. You can quickly seat all athletes by using any or all of the different automatic seating routines. Using ErGO!, you can easily create many reports including Heat Sheets, Coaches Reports, and Potential CRASH-B Qualifiers reports. ErGO! is a Microsoft Access database developed for use at the Southern Sprints CRASH-B satellite regatta. It is now in use at a number of Indoor Racing events around the world. ErGO! is available from Eileen Corelli at ecorelli@earthlink.net mailto:ecorelli@earthlink.net”
The VRA uses .RAC files to configure races. This file contains the information needed to configure race parameters such as the length of the race, the name of the race, race participant names, singles vs doubles, and so on. You can use eRow or the PM3 VRA to create the .RAC files. Both programs will allow you to run the program without hooking up ergs, type in names, and save the file. The application will complain about not having ergs, but you can still be successful in creating the files. The Class variable (see below) cannot be introduced into a file using this method.
The Class variable in the .RAC file is optional. If used, the application will separate rowers into groups which act as sub-races. Imagine you have 20 ergs hooked up, but you have 5 lightweights and 8 heavyweights in the Mens 60-69 age group. Without the class variable, the heavyweights are competing against the lightweights. With the class variable properly used, there will be two first place winners: one from each “Class.” During the race, the boats are displayed in different colors to provide a visual cue that there are really two races going on at the same time. The PM3 meters ahead/meters behind display will show the participant only other rowers in his/her own class.
Default boat colors for class races are as follows:
Class 1 Yellow
Class 2 Grey
Class 3 Pink
Class 4 Light Grey
Class 5 White
Class 6 Yellow
Class 7 Grey
Class 8 Light Grey
Class 9 White
Class 10 Blue
If you want to modify this color order or change the colors, you must edit the Windows registry. WARNING: Changing the registry can be dangerous and can cause system instability. Do this ONLY if you know what you are doing. Registry entries are located here:
HKEY_CURRENT_USER\Software\Concept2\PM3VenueRace\BlimpView
If you plan to create your own race files using a text editor, you must follow the formats described in the following sections. Note: “//” in the following sections denotes a comment describing the data.
NOTE: DO NOT RELY ON THIS, I CANNOT VERIFY IT’s ACCURACY.
RACE // file type signature; must be first line of file
106 // version
team configuration (singles=0, doubles=1, fours=2, eights=3)
race name // see Note 1
race duration in meters or seconds
duration type (distance=0, time=1)
0 // this line is always zero
enable stroke data (true=1, false=0)
splits distance (meters)
splits time (seconds)
number of boats (1 to 128 team racing only, zero for singles race)
boat name
bib number
class name
country (AFG ARE ARG ATA AUS AUT BEL BHR BMU BRA
CAN CHE CHN CZE DEU DNK EGY ESP EST FIN FRA FXX GBR GRC GRL GTM HKG HRV HUN IND IRL ISL ISR ITA JAM JPN KOR LUX LVA MAC MEX MWI NCL NER NIC NLD NOR NZL OMN PER PHL POL PRI PRT RUS SAU SGP SWE THA TTO TUR TWN URY USA VIR YUG ZAF ZWE)
birthdate format (ddmmyyyy)
// repeat boat name bib number, class name, country, and birthdate for each erg
RACE // file type signature
107 // file format ver 107 including class.
0 // team config (singles=0, doubles=1, fours=2, eights=3)
T0830aF02 // race name; see note 1
100 // distance in meters
0 // duration type (distance=0, time=1)
0 // always zero
1 // enable stroke data
500 // splits distance in meters
120 // splits time seconds
4 // actual # of boats in this race (2-40)
Randy Heigel // participant name; see note 2
687 // identifier (bib number)
E4F1 // class; see note 3
63 // country code; see note 4
02101957 // DOB; can be left blank
Nick Rockwell // next record
254
E5F1
63
02101947
Bob Hobkirk
11
E5F1
63
02101949
John Harbaugh
146
E5F1
63
02101945
0
Note 1: Race Name is shown on the PM3 monitor. This must be limited to 16 characters or the application will not allow you to start the race.
Note 2: Rower Name is shown on the PM3 monitor during WARMUP. This is
approximately 12 characters long, but it is also dependent
on width (names with wider characters such as “W” and capital letters take up
more space, which will result in fewer characters displayed on the PM3. Rower Name will be also displayed to the user
while rowing. While rowing, the name is a bit shorter, (about 11 characters; as
few as 8 characters with wide characters and CAPS). You can make this string long if you like
(but please avoid punctuation, especially commas) the PM3 will truncate as
needed. Finally, this string is also
shown on the TV's. You can make the
string longer, and add in class information like "
Note 3: For class—If you are running a single class race, make this string the same for all records (using a blank line is acceptable). If you have 2 classes, then make the string the same for everyone in Class 1, and the same for everyone in Class 2. To keep it simple, you could simply use "Class1" and "Class2," but any string will do. ErGO! uses class names such as E5F1 which represents Event 5, Flight 1. This string is only displayed to the computer operator in the class-view options. Finally, DO NOT mix up the order! Keep them all grouped properly.
Note 4: This is assumed to be country code. AFG is the default. This variable has no active function and is just a placeholder. Please note that in the example above (pulled from Eileen's documentation) this is a number. At one point it seems that numbers were used, but in any actual files viewed at Concept2, this value has been a 3-digit string containing one of the following: AFG ARE ARG ATA AUS AUT BEL BHR BMU BRA CAN CHE CHN CZE DEU DNK EGY ESP EST FIN FRA FXX GBR GRC GRL GTM HKG HRV HUN IND IRL ISL ISR ITA JAM JPN KOR LUX LVA MAC MEX MWI NCL NER NIC NLD NOR NZL OMN PER PHL POL PRI PRT RUS SAU SGP SWE THA TTO TUR TWN URY USA VIR YUG ZAF ZWE
In addition, the following Country Codes have been added as “Set Language” codes in a .RAC file. Only these codes will cause a PM3/PM4 to change language if the appropriate settings are chosen: CHI=Simplified Chinese (PM4 only), POR=Portuguese, FII=Finish, DAN=Danish, SWD=Swedish, DUT=Dutch, ITL=Italian; GER=German; FRE=French; SPA=Spanish; ENG=English
Note 5: Only US ASCII is accepted. If you are using other applications and embedding diacritics (letters with dots and other marks above, etc.), most of this information is lost or converted to some similar but still strange characters (for example, boxes, quote marks, and so on). Try to stick to standard ASCII. Test your race files by loading them into the VRA.
If you are generating your own .RAC files, or even using ErGo, it is advisable to load all the race files in advance and test them to be sure they work acceptably. To do this:
· Run the VRA (even without ergs hooked up)
· Cancel the wizard (and any other popups that appear)
· Open the race
· When the Modify Race window is displayed:
· Check the meters or time, and grouping
· Ensure the race name is less than 16 characters (or the race will not load)
· Click Cancel. The race is now loaded.
Things to check for:
· Do all the names look ok?
· Are all the names there? Be sure to check the first and last name on the list.
· Multiclass Races: Are ALL the boats in order (1, 2, 3, etc). (If classes are not done properly, you can end up with boats out of order.)
file type signature ("Race Results")
file version ( currently 101)
blank line
header
boat results: (Place,Time Rowed, Meters Rowed, Boat/Team
Name,Avg. Pace,ID,Bib Number,Class) - repeat for each record
blank line "Detailed Results"
blank line ' boat results (place,boat,boat/team name,finish time,finish
distance,avg. pace,rower's ranking ID,class)
individual results (,,,Rower
Name,Class,Distance Rowed,Avg. Pace) . . . notes: Boats are sorted by place.
For detailed results, the section of repeated for each boat/team.
In eRow, this recorded data for every stroke the user took. In the Venue Racing application, the data is taken periodically. The default period is about 500mS (1/2 second). This data can be used with third party programs to re-play the race from start to finish.
Shows the splits for each participant.
Transaction logs files are created for every race which shows all the data flowing. If you have a problem with a race, we would encourage you to save these log files (they do get VERY big, sometimes 4-5 megabytes!) and send them to Concept2 with some notes as to what happened. This allows C2 programmers to diagnose the problem better.
Concept2 suggests putting "Stars" in the first class of a multi-class race. This way, they are more often on the screen. As of this writing (12/04, VRA Ver 2.6.11)... when autosorting happens, the VRA tends to jump to the top of the screen.
When more than one PC and race line is used, it has been found a good practice to start the slower heat first, followed by a start of the faster heat. This may result in the heats ending closer together. In addition, to avoid false starts, it is suggested that you start the back rows first, then the front rows.
Race Day Scheduling. Although 15 minutes is a standard spacing between races, it is wise with larger venues (20 or more ergs per computer) to schedule the occasional race at 20 min spacing, or to add some awards ceremony timeslots should there be technical difficulties.
Concept2 suggests leaving 10 extra minutes in the race schedule for setting up adaptive rowers, plus obtaining in advance the estimated times for each rower and using the slowest rower plus 10 min for the time slot.
Using Windows Networking can be a convenient way to get last minute .rac files to the race computer and get results out of the application for posting. Please use common sense when using Networking. Concept2 suggests the following:
1) Make sure that you are not running other applications on the PC running races. Please do NOT run ErGO on the same PC while running a race.
2) Except as listed below, do NOT store files other than are needed for the Venue Race Application on the race computer on a shared drive/directory.
3) It’s OK to retrieve .RAC files from another computer (say a PC running ErGo in a “participant registration” area of your venue).
4) It is NOT recommended that you place results, stroke data, or log files on a network drive. Rather, share you’re “My Documents/Concept2” directory on the network, and allow a single person to occasionally download the results files or upload new .RAC files to the race PC.
If you have further questions regarding these recommendations, please contact Shawn or Scott at Concept2.
Some things to keep in mind regarding your race participants:
· Participants should be advised of new race start sequence
· Participants can change units on the top half of the screen during the warmup, during the race, and after the race. They can press CHANGE UNITS starting when they see SIT READY. They can again press CHANGE UNITS when the word “ROW” disappears from the screen. The racing application does NOT change the units display on their screen.
· Scorekeepers taking manual times on paper should be trained to use the CHANGE UNITS button as needed to get the final score, or use the score on the next-to-last line on the lower half of the screen.
· Particpants can, after the race is complete and all results collected, press the CHANGE UNITS button to obtain their splits.
· LogCards are NOT PERMITTED during races (Maybe 2006/2007 races?)
· HeartRate monitors are not permitted nor will their heart rate be displayed.
· If an erg becomes disconnected from the computer during a singles race, the participant will see "Keep Rowing" in the space at the bottom. The PM3 will continue to keep the participant’s score. The results may not be collected by the computer at the end of the race, so instruct the participants to write down their score right after they are done. The lower half of the screen is for informational purposes only and is NOT a guarantee that the participant will end in a particular place. There are many reasons why this data may not be perfect. For example, if the computer disconnects from one or more rowers (other than the participant’s), the race continues, but the disconnected rowers scores will not continue to be displayed for other rowers.
· The instant "Row" is shown on the PM3s screen, the clock in each PM3 has started. Any delay on the part of the racer is reducing their score.
· Posters and informational sheets can be found on the Venue Racing software download page on Concept2’s web site.
All kit contents are subject to change without notice.
Laptop, Dell Insperion 600m
USB Hub in bracket, qty 2
USB Hub power supplies, qty 2
USB Extension Cable, Qty 1
USB Cables, qty 12
Concept2 USB Memory Stick, Qty 1
VGA Y Cable
Laptop, Dell Insperion 600m
USB 2.0 Cable, 15 foot, qty 1
Terminators, Qty 2 (per race line)
Ethernet patch cable, 25’, qty 1
Ethernet patch cable, 15’, qty 1 per erg in race line
PM4 Monitor:
One per erg in race line; plus one for master; plus several spares.
Concept2 USB Memory Stick, Qty 1.
VGA Y Cable
Errata: Known issues.
Relay Race: When several team members row a short period of a longer race.
Team Racing: Doubles, 4’s, or 8’s, where 2, 4, or 8 member teams scores are averaged.
USB: Universal serial bus
Wired Racing Method: Method of interconnecting PM3’s using Ethernet cables. The PM3’s do not actually use “Ethernet”, but Ethernet patch cables are used as a convenience. The actual protocol utilized is RS485.
Shielded UTP Cables: Ethernet cables that are shielded. Normal Ethernet cables are NOT shielded.
Switching Power Supplies: Electronic gear (like portable and cellular phones, etc.) use power adapters to convert your household power to low voltage. Older power adapters were heavy and bulky. These are “Transformers” with a “Linear Power Supply” built in. Newer adapters that are smaller and lighter use “Switching” methods to convert your household power to low voltages. Switching power supplies are cheaper to make, are more efficient, smaller, lighter and increasingly popular.
There are times where it may be necessary to edit the registry. Please be careful when editing the registry as. Below are some guidelines related to the Venue Racing Application:
· To edit the registry, click on Start, then Run. In the box type “Regedit” and hit Enter.
· To find the Venue Race registry keys, hit the + mark on the following:
· HKey Current User
· Software
· Concept2
· PM3VenueRace
Here are a list of keys of interest:
Erg Map: this is a list of the ergs that are attached, their serial #’s, which physical erg number they are, master/slave status, etc.
· If you are having problems enumerating your field of PM3’s, you might try exiting the Venue Race App and deleting this key. This key will be recreated when you run the Venue Race App again, and you can renumber from scratch.
· You can also right click on Erg Map and “Export” this key to make a backup which can later be restored, or moved to another computer.
Blimp View: Various settings for the display:
Class 01 (..10) Color: This is the color of the boats for any particular class. They default to some preset colors, but you can change them. Please pay CLOSE ATTENTION to the colors and the spelling: There is NO error checking on these registry keys. Invalid responses may result in improper operation and/or crash the application.
Lane Spacing: This defines the number of pixels between lanes (default is 43 decimal). You can adjust this number UPWARDS to create larger lanes, or to align your lanes to the display when spanning multiple displays. A hint: Change to Decimal (the default Hex is harder to work with). You must exit the VRA, change the key, then re-run the VRA to make this change take effect.
Lane Marker Bouy Interval: By changing the default of 0 to a positive number will cause additional meter bouys to be displayed.
Under Blimp view, control is now available for font and color specification for many graphic elements. Please exercise care when modifying these values, as no error checking is performed and results will be unpredictable.
Q&A’s from users:
DISPLAYING
MORE BOATS:
Dear Scott,
We've tried for some time
before the races we had last month how to see in the PC screen as many
"ergs" as possible. Having into account that we were going to have 30
rowers linked to the system it was a kind of a "waste" not to be able
to see all of them or at least as many as possible during the race day.
Unfortunately we only
achieved to see 21 rowers at a time in the PC, but excluding their pace times
in the right side of the screen when projecting, and only 15 rowers with all
the information both in the PC and in the projector screen. This is the way
that we run our race and only the first 15 rowers could see their performance in
the screen.
I would like to know if
there is any special PC, screen or projector resolution wich enables to see
more than 15 rowers at a time in the screen. We are thinking about purchasing a
more powerful projector, but we want to make sure that the PM3 Venue Race
software supports bigger resolutions and also if this is possible having into
account the PC and the PC screen we already have (1680x1050 pixels is the
bigger resolution wich allows 21 lanes). Anyhow I've seen in photographs that
during the BIRC there were only 15 lanes in the screen, however in the replays
of the last Euro Open there are 35 rowers and I think that in
Thanks in advance and
regards,
David
*** RESPONSE ***
David:
I should note that I do not
believe the competitors need the blue screen with yellow boats to show to
them. I believe that this is for the
audience only. I currently recommend facing
rowers away from the screen, they have what they need on their PM3. However that said, I like to show all boats
on the audience screen.
The Venue Race software will
support whatever screen you can dream up and get the hardware to run. The only issue is do not attempt to change
resolutions, color depths, or screen orientation(see more below) with the venue
race app running. Exit the app, change
the settings, then re-run the app.
Now, BIRC was a simple setup
- only one display of 13 or so lanes per setup of 40 rowers. However, they turned on "Sort
Lanes" which puts them in "place order" every n (in birc case =
250) meters. I personally don't like
this as A) you still cannot see everyone; B) it's confusing as they get jumbled
up.
At Euro Open/Copenhagen, we
used a computer with a multi-VGA output.
Products like the PNY NVS400
card (about US$375) is a PCI card and has 4 vga outputs. Each one can display 10-17 boats. In addition, there are LOTS of fun options to
play with (play with care please!) as the displays can be rotated 90 degrees
(portrait mode) giving you more lanes (ie the screen is taller than wide).
So, at Euro/Copenhagen, we
had Display1 on the "bottom" with normal windows taskbar, Venue Race
control panel, etc. Display 2 and 3 were
stacked in windows "on top" of display 1. Get the VRA up and running, enumerate your
PM3's, and test. Then make the VRA
window smaller and drag it from display 1 up to the top display. Now, resize the window dragging it (expanding
it) across display 2 and 3. Now you have
27-28 lanes (13 maybe on the first, 14-15 on the next). Resize the screen to
1024x768 or 1280x1024, or
rotate them and get lots more. Be sure
your large screen display can handle it.
There are lots of
"gotcha's" in a setup like this though:
1) Never never expand the
VRA race display outside the bounds of ANY display, this will virtually
paralyze the performance of the PC. Keep
it inside the bounds on all sides.
2) Sometimes the split
between displays will have a lane that is 1/2 cut off. You can sometimes just adjust the positioning
of the windows manually to adjust for this, but strictly adhere to rule #1
above.
Also, there is a registry
entry that I sometimes (and did in
tweak: it's the # of pixels
between lanes. This helps me to adjust
and reduce the effect of a cut-off (split) lane.
3) The more lanes displayed,
the more it is stretched between screens, the more the app and the computer
labor under the amount of data. Many
settings in the NVS-400 have to be set properly. I think I have some of them documented, I'll
try to write them up at some point. But
don't be surprised if performance is SLUGGISH, including mouse pointer that
barely moves when a race is being set up or enumerated, or a race is running.
Without the expense of the
NVS400 card, you can just add a normal or dual output vga card to your existing
desktop PC to add desktops.
Please test long before your
race though, some don't like to co-exist, or you could run into windows/vga
chipset driver/resource conflicts.
For Laptops, there are
several products that will add a display: VTBook is a PCMCIA dual-video
card. Untested, but should work. They also make PCI to PCMCIA adapters that
should allow a NVS400 or similar video card to work on a laptop. See resources area of www.ultramon.com for more information. UltraMon is a cool utility that I highly
recommend, we use it on our RIB (race in box) laptops.
1/8/07: ADDED NOTE: Targus makes a USB Docking Station (Part # ACP50US ) for
computers which includes VGA capability.
This should add an additional VGA port to any computer!!!!
Another option is a product
called Maxi-Vista. This allows you to do
the same as above but using several PC's.
It has not been fully tested but appears to work OK. See their website for more information on how
this works. A possible problem: if connection between the PC's is lost, the
desktop will resize and the VRA _will_ loose it's blue/yellow screen. The race will proceed, but you will loose
your audience display.
For medium sized races,
there is another option. Certain laptops
have dual-monitor capability. My Dell Insperion 600m (now obsolete) can, if you
fight with it long enough, do something very cool: Mirror the LCD on the VGA output, and have
another windows desktop on the SVideo output.
You still have to contend with the control panel (keep it out of the
way) but at least you get more than 13-17 lanes. It is a
STRUGGLE to get this to work, but it can be done.
Now as far as projectors,
etc are concerned: I know that there are
more and less capable units out there.
You'll need to look at the specs and better yet actually TRY the
projector before you buy it. Some
projectors are capable of much higher resolutions than others. Some do it by compressing it to smaller
resolution, which is ok but you will suffer loss of some
"clarity". Which interface
you use may also make a difference in clarity and resolution supported: VGA vs. Composite vs. SVideo all may have
different support. Test test test. Try to use the least conversions: If you can get VGA into the projector, then
do it. If you need to go long distance,
look for products that will repeat VGA signals for a long distance.
That's about the best I can
do at the moment. The AV stuff is really
up to the race organizer. I can help as
much as I can with getting the signal to Windows and VGA card, then you're on
your own. Discussing this with a local
supplier (sales or rental) of professional AV equipment would be a very good
move.
-
Scott
See Also: AutoSort under the OPTIONS
control
See Also: RIB Display Setup